Thursday, December 18, 2008

Trial & Error
(snowflake #3)


I think we bloggers often times only come to our blog readers with the best we have to offer. The writer drafts, edits, composes a final draft, and then humbly lays their offer before the public throne. Well, I thought I'd share a do that's NOT like that at all. You see, everything really is 20/20 in hindsight. And sometimes we end up nowhere near where we thought we would. :)

So I think I'm starting a whole new section of "Trial and Error" dos that really looked great in my mind (really) and just didn't turn out at all like I imagined (I have a whole file of 'em, truth be told). Along with "Trial and Error" I'd like to have a "Fix a Flop" section where any of you (including my fabulous hair blogging sisters) take it and well, uh, fix it in your own unique way.

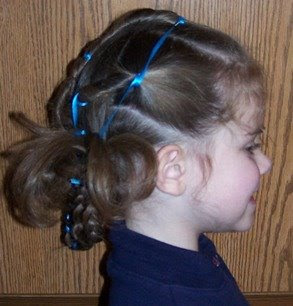
Today I offer my snowflake #3. If you turn it to the side, squint your eyes, and hold your mouth just right, you can at least imagine a snowflake. Right? :wink: This was from my "snowflake" experimenting days. And I realize I'm making a bigger deal out of this than necessary, but it's time to have some fun with my own mistakes. I would even do this one again with a couple small changes.

So...here's how it began. A pony tail. (sound: DUM DUM DUM) Looks innocent enough (prolly should have stopped here), but the plot thickens. Keep looking if you dare.
Then I separated the pony into 6 (equal) sections and started making corkscrews (but you could do braids or twists or whatever you fancy).
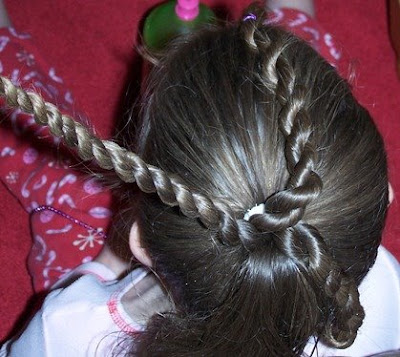
YAY! They're done, should be a piece of cake from here (Mmm, cake sounds really good).

Okay, I knew this would be an issue because my darling's hair is pretty long. So I made the corkscrew even tighter which definitely shortened the corkscrew a bit. Then...

I doubled it back on itself. Kinda messy, but we're tying ribbon around it later anyway. No one will hardly even notice it.

Nah...I didn't like. So instead I twisted the hair into little snakes and bobbied them in place (the doubling back would have been best).

I KNOW the little twisties look kinda funky. But at this point I didn't care (it had taken so long just to detangle this hair today). And now I was wishing I had never even seen the cute little PEACOCK do which spiraled me into this last minute dreamed-up snowflake do. But being the hardheaded momma that I am, I kept going.


I'm just gonna use these cutsie little clippies like Babes did for her adorable PEACOCK. Almost there...

Uh oh, what do you MEAN those clippies are too small for my darling's hair? Oh well, I'll just use these big honkin' clippies. That should hold it until I can get ribbon on it.

Ribbon goes on last. Darling picked some sheer ribbon--blue and white is seriously great for snowflakes. I started at the ugly twisty snakes and worked toward the pony.

Yes, I KNOW I didn't do anything cute with the ends of the ribbon (which all met in the middle of the original pony tail). I'm tired, my back hurts, and my pride is a little hurt, too.

So that's that. Not perfect, but it should help get the wheels in your head spinning in case you want to do something similar. Making mistakes is great for anyone wishing to get better at something. These mistakes spawned another couple ideas for dos that we'll do eventually, so nothing is a waste of time if we use it to stretch and grow.

We're beginning to prepare for a huge trek across the country for the holidays. If I don't see you before then, I hope everyone has a very MERRY CHRISTMAS and a HAPPY NEW YEAR!


Tuesday, December 16, 2008

Snowflakes


With all the wintry weather we've been having, a fun snowflakes do seemed appropriate. I'll post two different kinds we've done and I'll have to do a 3rd one some other time (but I'll describe it here).

First, I made three small front-section ponies like so:


And who can forget that snowflakes all have six points? So we made three small "anchors" at the bottom of the head--two out as far as possible and one right in the middle. Why did I leave the hair hanging down, you ask? Because it's in the NEGATIVE temps here and I really like to keep the hair down as much as possible in the winter. The second snowflake style we've done will demonstrate it with the hair all up.

So...here are the anchors peeking up through the hair.


I decided to use fabric (again) instead of ribbon. So I cut off a thin strip of fabric and slit the end of it so that I could tie a knot around the first pony on the far right.


Then I decided to braid this snowflake. The fabric is just braided right into it and then anchored with the appropriate anchor at the bottom, like so:


In case it's difficult to see, I did also split the fabric at the bottom (once it's anchored) and tied it around the bottom pony like it was at the top. At the very end of this do I trimmed them all significantly. Here are some other final shots of this first snowflake do.


SNOWFLAKE #2
Actually this was snowflake #1, but who's counting. It's very similar to the first one except the hair is up off the neck. I also used twists instead and just sewed ribbon into it (messily, I must say). I also didn't cover the rubberbands all that well, so learn from my mistakes.

This was quickly done and I'd suggest wetting the hair before hand--I didn't and the twists were a bit messy, as you can see. I'll just put the pix below:


SNOWFLAKE #3

I'll just describe the 3rd snowflake--it's probably the easiest of the three to do, too. In a nutshell, you'll go to Babes in Hairland's PEACOCK post where she has some great directions and pictures. To turn this into a snowflake, after you make the pony:
--1) Divide it into 6 sections (use ALL the hair)
--2) Braid, corkscrew or twist each section
--3) Clippie them around the pony (as far away from the pony as possible)
--4) You can add ribbon or fabric or whatever you'd like to make it look more snowflaky.

If I have time later this week, I'll get some picks up, but I think that Babe's explanations and pixs of the main peacock do are super and can be used in a multitude of ways like for snowflakes or spider webs, etc.

Before the season is over, I hope, hope, hope to perfect our snowman and post it. Frosty, it appears, has a little mind of his own! There are a few other holiday dos that probably won't make the cut this year. But it's always fun to play around.

Friday, December 12, 2008

Candy Canes and
Poor Mom Bows


Today we're demonstrating a couple ways to make candy canes in hair. The first way is just one big candy cane across the whole head. For those of you who know what you're doing, this is basically just one long puffy braid twisted in the shape of a candy cane. You can do it with a french braid or a french corkscrew or even by twisting the hair. I just added a different accessory to it and voila.

First, take the front right small section of hair and make a small pony like in the picture below. Probably the most important part of this "do" is to start in a place where you have enough room to finish the top curvy part of the candy cane.

Then I just used a strip of fabric about 8" X 1" to tie a decorative knot around the elastic (you'll cut this after you're done with the do so that it'll be a lot shorter). The rattier the fabric the better, in my opinion. We're going for a crafty, country Christmas feeling here.

Then grab another section of hair, closer to the front of the head (making sure that you're working on your candy cane form) and do the same thing--elastic it (along with the hair from pony #1) and tie a knot around it. You can use trash ties or any type of fabric for this. I just picked up some cheapo 5-cents-per-yard fabric and used that for this do (hence the "poor mom bows" reference).


Keep curving around, parting off sections of hair and being sure to use all of the top hair before getting to the back of the head. Don't worry about how long your fabric is. Once you're done knotting, we'll go back and cut the fabric ends off a bit.

The end of the candy cane will slant across the back of the head and end more to the right of center. This will help draw attention to the form on top of the head.

Okay, now...go back and carefully cut little edges of the ribbon off, like so. I left a bit of fabric still hanging, but you might want to cut off more.

To emphasize the shape of the candy cane I went back in with off-white ribbon and sewed loops around the puffy braid. I use a yarn needle, by the way, just to make sure there are no pokes.


Okay, for these candy canes, it's also very simple.

Remember the upside down braiding from our previous dos? That's all you're doing for the beginning of the braid on each side of the head. After parting the hair down the middle, you part off the front section of each side and begin french braiding upwards basically from the cheek toward the middle of the head. Then bend the braid around once you get near the part and start heading back down the back of the head like an every day french braid. Then just sew in your ribbon.


DON'T FORGET the current giveaways going on:

First, Busy Butler's Boutique is having a giveaway that ends tonight.

Second, Babes in Hairland is having continual giveaways this week.

Third, Bows by Christine is having a giveaway this week, too!

Let me know if I've missed any. And have a fun weekend, y'all!


Thursday, December 11, 2008

Christmas Tree and a ♥GIVEAWAY♥


We've really been in the holiday spirit lately--baking cookies, burning the fireplace, lighting candles, setting up our Christmas village, wearing our thick footed PJs, etc. For fun over the last week we've done several Christmas hairstyles including this Christmas tree hair do. Fearing that my little blog has been forgotten, I almost didn't post this. But who knows...maybe someone else can use and enjoy it.

First, pull up the front hair into a top knot (a top knot is when you do a half pony kinda up on top of the head near the back).


Next, part the hair left in the back down the middle and keep each section separated.

Then let down one side in the back and take half of the top knot pony and start braiding down one side.

If you just want it to end in low ponies then elastic it off at the bottom. Or you can braid all the way down. We've done this both ways, so it's just a matter of preference. Now let down the other side and take the remainder of the top knot and do the same thing on the other side.

Now it's just time to decorate. Get out your ribbon (I think the thinner ribbon looks better, but I've tried the thicker), get out some cute buttons, put beads on bobby pins (or, better yet, use those cool little things Babes In Hairland showcased this week--gotta get my hands on some of those!), or what about these cool miniature Christmas lights (available at craft stores)?


Use whatever you'd like... And I know this isn't perfect, but you get the idea. What I REALLY wish I had was a cute star clip to put at the very top. It really would have been that final touch.


And how about this GAUDY version? Who says you can't involve little brothers and sisters in the decorating. In this one we used little clippies, big ribbon, beads, etc. I guess it's all about turning heads, eh? LOL!

I'm sorry that I've been SO out of the hair blogging world the last few weeks. First, I've just been extremely busy with all of my other work. Second, I still don't like this blog background (my daughter really loves horses/ponies, so I'm looking for something horse-like in case someone knows of something out there).

Now...for the GIVEAWAY!


Head on over to Busy Butler's Boutique. My in-real-life-friend Millie recently began making her own bows for her daughter. Due to continual compliments around our cozy village, she's now making them to sell. YAY! And this week is your lucky week because she's giving away two SETS of bows:

Each Bow Bundle will include:
1 set of Deluxe Hair Bows on Alligator clips
2 sets of "Bitty" snap clips - either bows or blossoms or one of each
1 "Baby Band"

All you have to do is visit her and leave a comment sharing a short "mom & me" memory. And you can actually get up to FOUR entries by following her directions. So go HERE now. Tell her I sent you over, too! This giveaway ends Friday at midnight (I'm assuming that actually means 11:59pm and not 12:00am which would actually be tonight). GO! GO! GO!