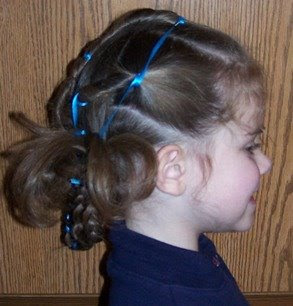
With all the wintry weather we've been having, a fun snowflakes do seemed appropriate. I'll post two different kinds we've done and I'll have to do a 3rd one some other time (but I'll describe it here).
First, I made three small front-section ponies like so:

And who can forget that snowflakes all have six points? So we made three small "anchors" at the bottom of the head--two out as far as possible and one right in the middle. Why did I leave the hair hanging down, you ask? Because it's in the NEGATIVE temps here and I really like to keep the hair down as much as possible in the winter. The second snowflake style we've done will demonstrate it with the hair all up.
So...here are the anchors peeking up through the hair.

I decided to use fabric (again) instead of ribbon. So I cut off a thin strip of fabric and slit the end of it so that I could tie a knot around the first pony on the far right.

 Then I decided to braid this snowflake. The fabric is just braided right into it and then anchored with the appropriate anchor at the bottom, like so:

 In case it's difficult to see, I did also split the fabric at the bottom (once it's anchored) and tied it around the bottom pony like it was at the top. At the very end of this do I trimmed them all significantly. Here are some other final shots of this first snowflake do.


SNOWFLAKE #2
Actually this was snowflake #1, but who's counting. It's very similar to the first one except the hair is up off the neck. I also used twists instead and just sewed ribbon into it (messily, I must say). I also didn't cover the rubberbands all that well, so learn from my mistakes.
This was quickly done and I'd suggest wetting the hair before hand--I didn't and the twists were a bit messy, as you can see. I'll just put the pix below:


SNOWFLAKE #3
I'll just describe the 3rd snowflake--it's probably the easiest of the three to do, too. In a nutshell, you'll go to Babes in Hairland's PEACOCK post where she has some great directions and pictures. To turn this into a snowflake, after you make the pony:
--1) Divide it into 6 sections (use ALL the hair)
--2) Braid, corkscrew or twist each section
--3) Clippie them around the pony (as far away from the pony as possible)
--4) You can add ribbon or fabric or whatever you'd like to make it look more snowflaky.
If I have time later this week, I'll get some picks up, but I think that Babe's explanations and pixs of the main peacock do are super and can be used in a multitude of ways like for snowflakes or spider webs, etc.
Before the season is over, I hope, hope, hope to perfect our snowman and post it. Frosty, it appears, has a little mind of his own! There are a few other holiday dos that probably won't make the cut this year. But it's always fun to play around.


7 comments:
Snowflake #1 is my favorite. Very cute!
W.O.W. I am speechless. That looks confusing as heck, but what a show stopper!
I also love #1! What creaivity you have, my dear. I may just have to eat you up and see if I can't "steal" some of it;) Thanks for the cute idea!
Thanks ladies. I like #1, too. But if I can get #3 the way I want it to look (it's more difficult with long hair) I really think it'll be a favorite around our house.
Joann-steal away. LOL As you know, I already assume that any of my "new" stuff has probably been done long before I did it. We're all recycling ideas in one way or another. It's SOOOO nice to be part of a hair sharing community!!!! <3
I lve the first snowflake! SO CUTE!
Stopping by to say I hope you have a blessed and very Merry Christmas! ♥ Hugs :) Shauna
I hadn't been over in a while, and I just checked out all your Christmas (e) hair do's--- very creative! Love 'em all!!! But I have to say that #1 is my fav too. I want to try that one with like 3 small ones in beans' hair.
Post a Comment